UG NX 10.0中文版
下载地址
下载地址


本地下载文件大小:2.61G
UG(Unigraphics NX)是Siemens PLM Software公司出品的一个产品工程解决方案。本文中kk下载给大家介绍的UGNX10是一款交互式CAD/CAM系统,UGNX10功能强大,可以轻松实现各种复杂实体及造型的建构,包含了企业中应用最广泛的集成应用套件,能够应用于产品设计、工程和制造全范围的开发过程。
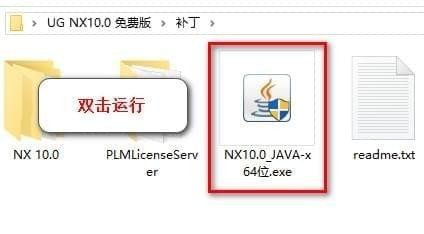
1.下载完成后解压到某指定位置,打开[补丁]文件夹下的NX10.0_JAVA-x64位.exe文件;
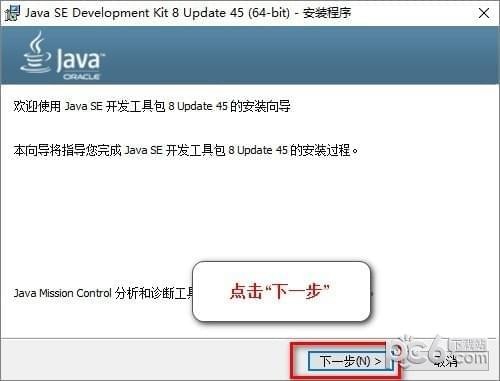
2.点击下一步进行安装;
3.点击下一步开始安装;
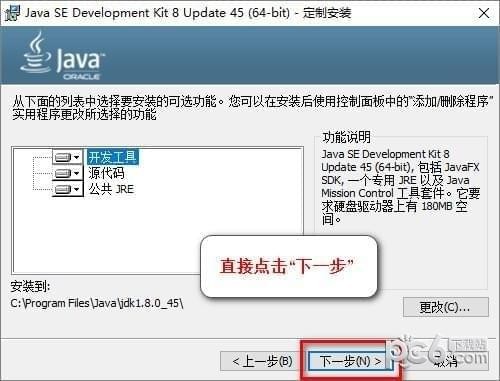
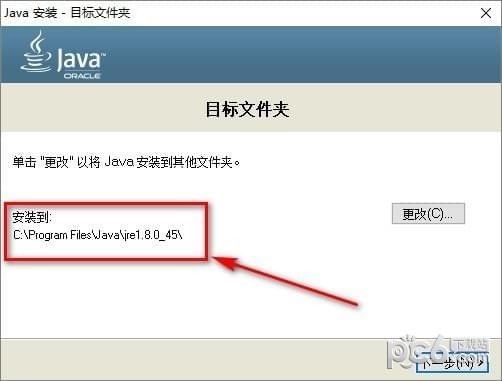
4.选择安装目录,默认安装在C:\Program Files\Java\jdk1.8.0_45(建议安装在除C盘以外的磁盘上,可在D盘新建文件夹D:\Program Files\Java\jdk1.8.0_45),点击下一步。
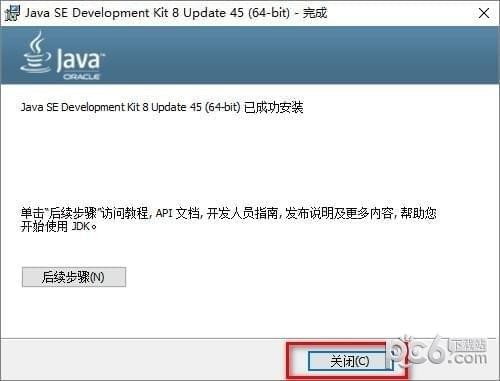
5.安装完成后点击关闭,关闭窗口。
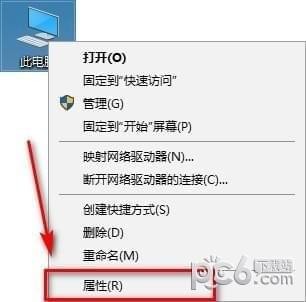
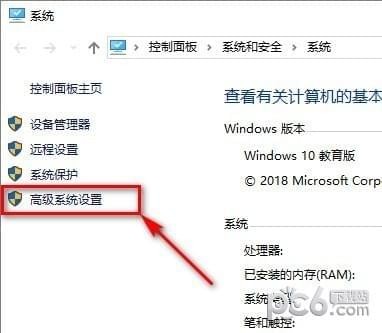
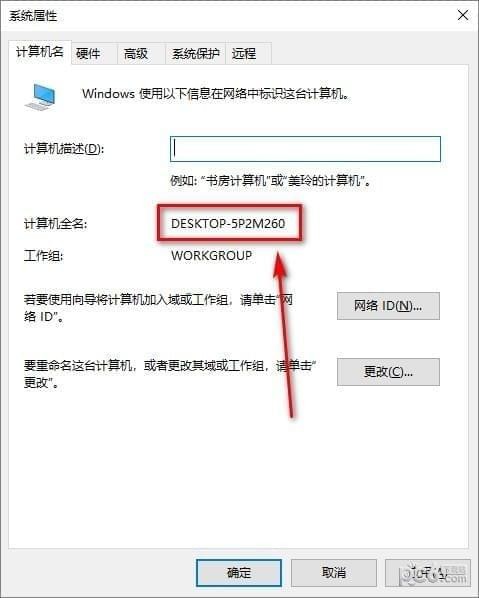
6.右键我的电脑,选择属性,点击高级系统设置,在计算机名选项卡下复制当前计算机名称。DESKTOP-5P2M260
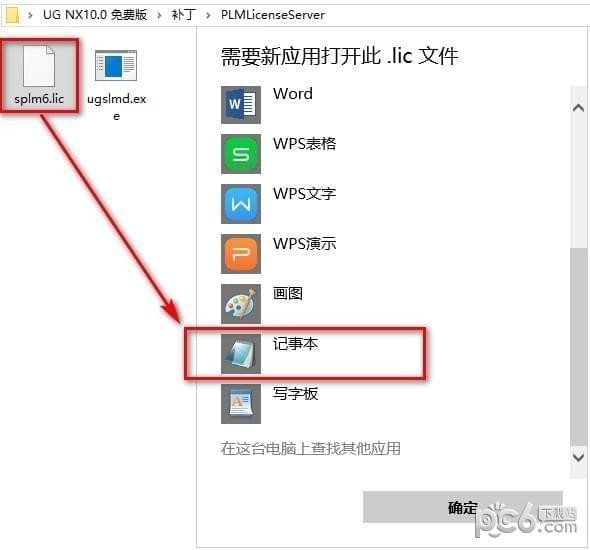
7.打开补丁文件\PLMLicenseServer下的splm6.lic文件,右键以记事本方式打开。
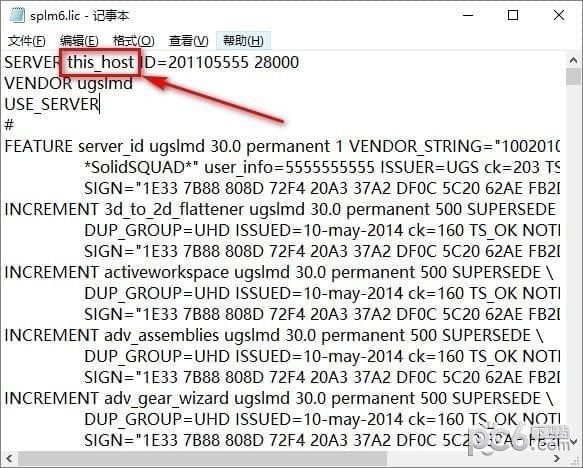
8.将this_host替换成刚才复制的计算机名;
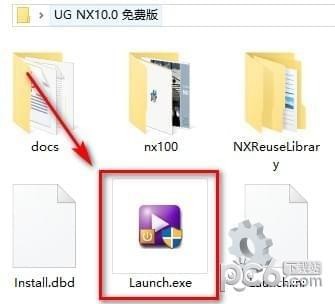
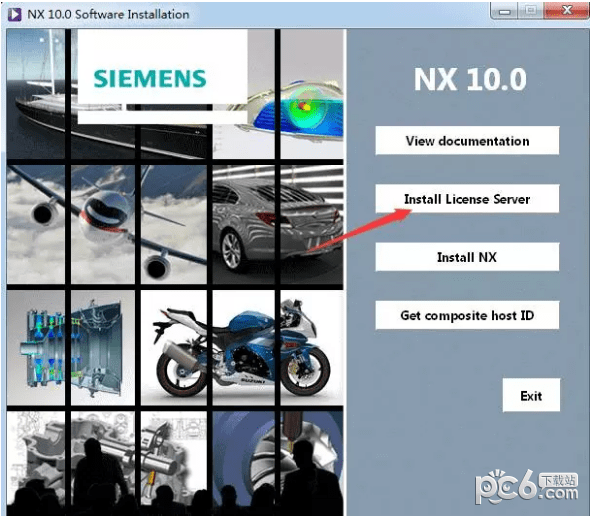
9.打开主文件夹,点击Launch.exe程序;
10.点击第二个Install Lincense Server;
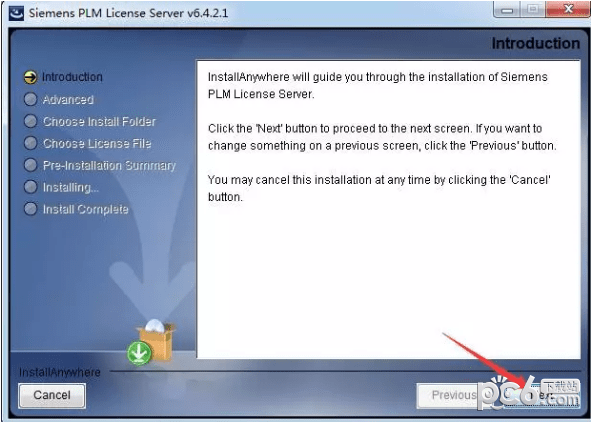
11.点击Next到下一步;
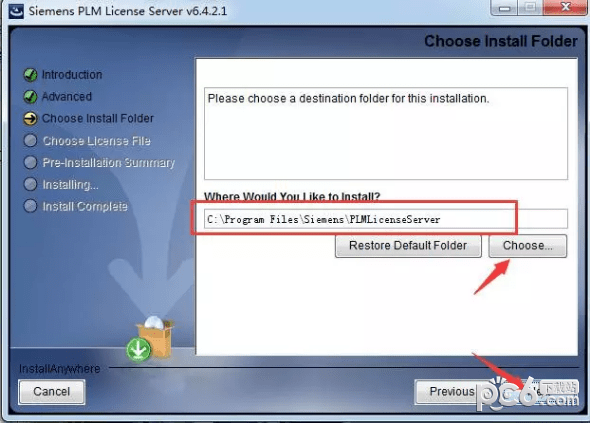
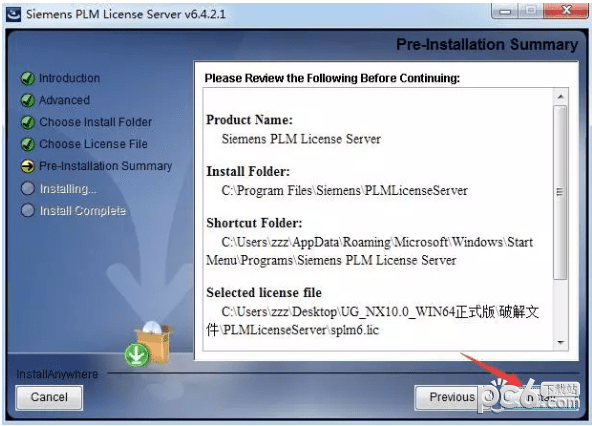
12.选择安装目录,默认安装目录在C:\Program Files\Siemens\PLMLicenseServer(建议安装在除C盘以外的磁盘上,可在D盘新建文件夹D:\Program Files\Siemens\PLMLicenseServer,点击Next。
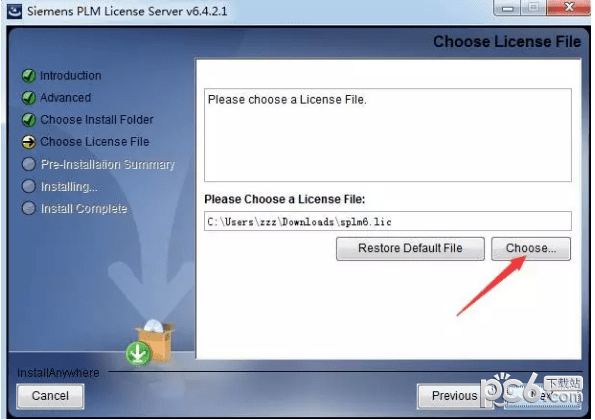
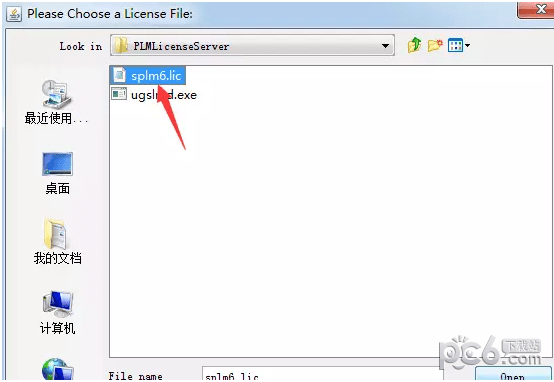
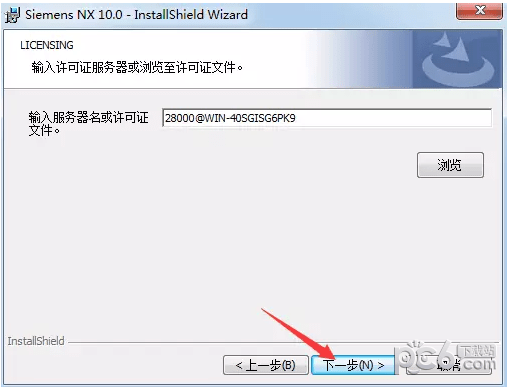
13.点击选择,选择刚才更改计算机名的在破解文件\PLMLicenseServer下的splm6.lic文件,点击Next。
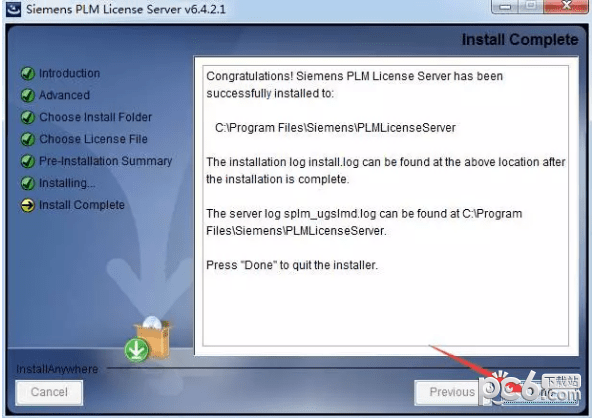
14.点击Install开始安装。
15.点击Done确定。
16.安装主程序,选择第三个点击;

17.保持默认,点击确定;
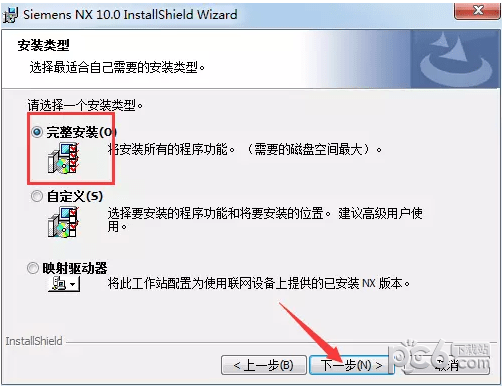
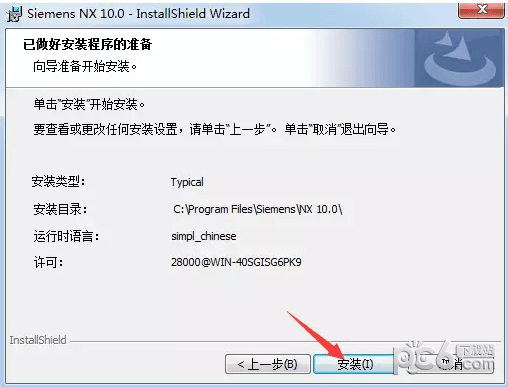
18.选择典型完整安装,点击下一步;
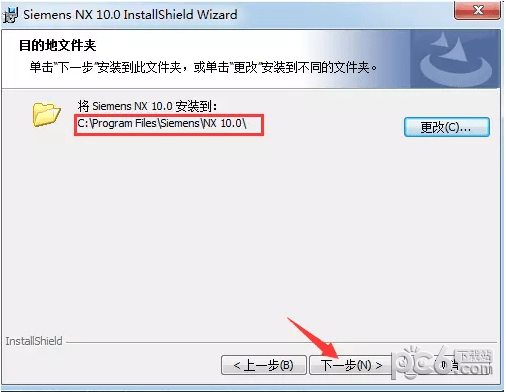
19.选择安装目录,默认安装在C:\Program Files\Siemens\NX 10.0(建议安装在除C盘以外的磁盘上,可在D盘新建一个文件夹D:\Program Files\Siemens\NX 10.0\),点击下一步。
20.点击下一步;
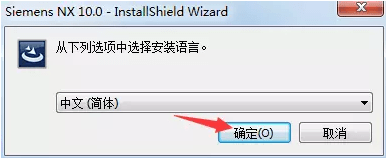
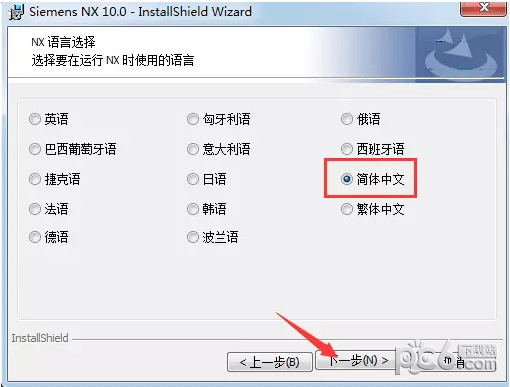
21.选择简体中文,点击下一步;
22.点击安装;
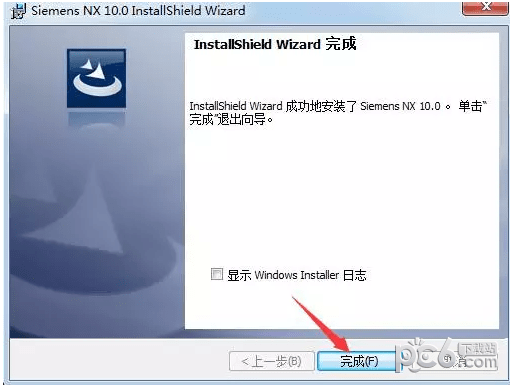
23.点击完成;
24.打开补丁文件文件夹,复制该文件夹下的以下两个文件夹;
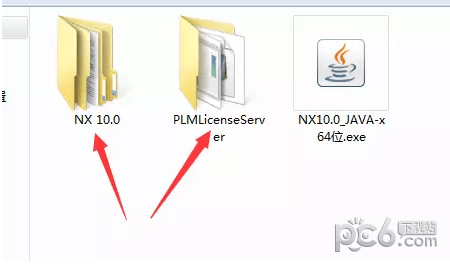
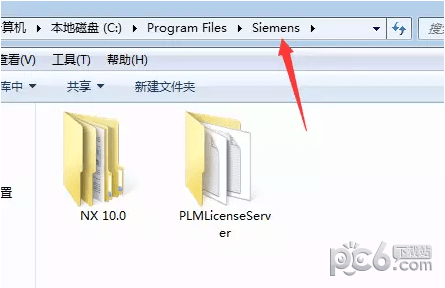
25.打开安装目录下的Siemens文件夹(默认为C:\Program Files\Siemens),粘贴替换刚才复制的文件;
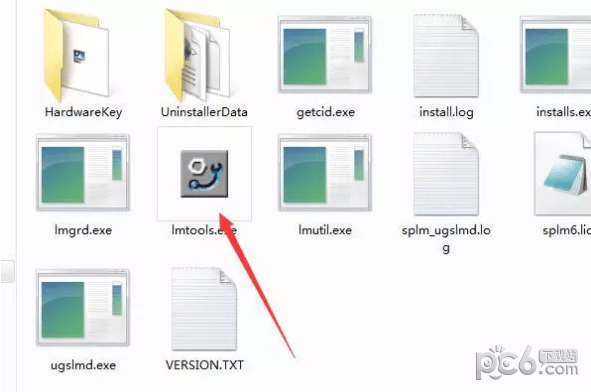
26.打开C:\Program Files\Siemens\PLMLicenseServer文件夹下的lmtools.exe文件;
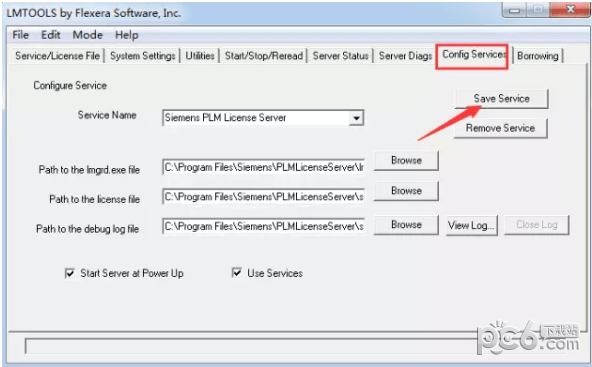
27.在Config Services中,保持默认,点击Save Services;
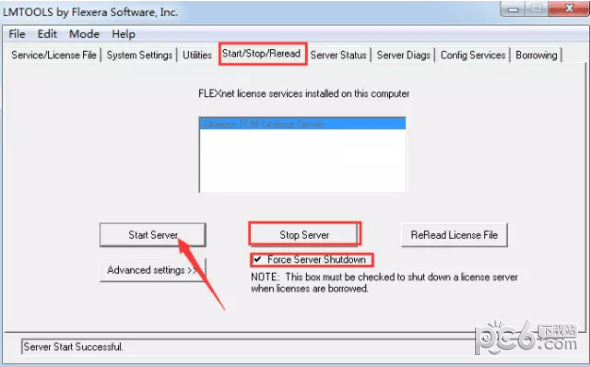
28.在Start/Stop/Reread中选中下方复选框,点击Stop Server,然后点击StartServer,在下方显示Server Start Successful,关闭窗口;
29.安装到此完成,打开UG即可。
1.较大 的更改,ug10.0适用中文名字和汉语途径。
2.插进-曲线-最终2个,一个是提升3D曲线和GeodesicSketch,全是新作用。
3.UG10.0新增航空设计方案选择项,钣金件功能增强。
4.航空设计方案弯边
5.航空设计方案筋板
6.航空设计方案台阶
7.航空设计方案支撑架
8.在捕获点的情况下,新增了一项“顶点”捕获,再用一些指令的情况下能够对斜面和斜面的顶点开展捕获了。
9.艺术创意塑形是以NX9.0刚开始有的作用,ug10.0提升了好智能,并且比NX9更强劲,迅速模型这一方位是发展趋势,是关键发展前景,UG10.0新增了:
10.施工放样框架
11.扫掠框架
12.管路框架
13.拷贝框架
14.框架多段线
15.提取框架多段线
16.插进莱单多了个2d组件
17.ug10.0資源条管理方法更为便捷了哦,在侧栏的工具栏上,多了个“資源条选择项”按键,可立即对資源条开展管理方法。
18.在ug10.0鼠标键主视图变大.变小时,和之前历年来的版本号恰好反过来,鼠标左键+中键,方位向下是变小,鼠标左键+中键,方位往上是变大,之前则不是这样。
19.剪修与拓宽指令切分成2个指令,更强用。并且,拓宽参考点值可以用负值了,之前没分拆前是不能负值的!换句话说如今很有可能减少片体了。
20.绘图里边多了个绘图“横截面线”指令,能够对主视图开展草图横截面线。
21.删掉面作用新增“圆弧”指令。
22.新增:参考点三维曲线,在UG莱单上的,【插进】——【继承曲线】——【参考点三维曲线】。
23.注塑模具专用工具里的【建立格子】(即建立壳体.作用新增2个作用:适用圆柱体和长方形作用添加到里边。
UG NX 10.0中文版 破解版2.61G返回顶部
Copyright © 2009-2025 KKX.Net. All Rights Reserved .
KK下载站是专业的免费软件下载站点,提供绿色软件、免费软件,手机软件,系统软件,单机游戏等热门资源安全下载!
本站资源均收集整理于互联网,其著作权归原作者所有,如果有侵犯您权利的资源,请来信告知
 Adobe PhotoShop CS2 绿色精简版
 无痕去水印官网版 v1.7.6
 美图云修免费版 v6.5.2正式版
 Corel全家桶注册机2019 中文版
 bkViewer图片浏览器 v7.4a
 墨刀MockingBot v0.7.8.0中文破解版
 金舟图片压缩器正式版 v3.4.6
 Photoscape图像编辑器 V3.7.0中文绿色版